_How-to Build an Earthbench Foundation

Check out our How-To Foundation Video
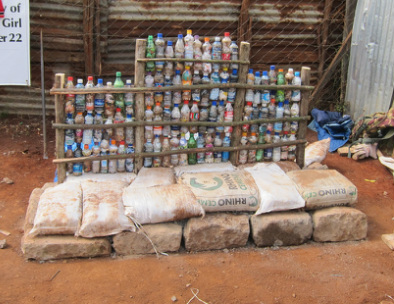
The Earthbench foundation is the most important part of your Earthbench project. The foundation is built with gravel drainage and a large rock base to prevent water from getting in contact with the bench. If there is any contact between the earthen building material and the ground the bench could start to erode.
The main components of the foundation are:
1) Gravel drainage. Typically at least 6 to 8 inches deep, built within the "footprint" of the bench. The best gravel to use is 3/4" drain rock, although most types of gravel should work fine.
2) Posts to hold bottle bricks. If you are building a back to the bench, you want to sink in wooden or bamboo posts into ground below gravel drainage (~1 foot below the top ground level). The posts should be the same thickness of the bottles.
3) Large rocks to form perimeter around Earthbench footprint. Ideally these are river rocks, bricks, or some sort of attractive stone. These rocks will be visible once bench is complete. Rocks should ideally provide at least 6 inches of spacing between ground and the earthen building material. May need to double stack to reach appropriate height.
4) Bench mass. In order to create the mass of the seat, you can use multiple different materials and techniques. The easiest is to use urbanite, or broken concrete pieces (think the remains of someone's driveway or sidewalk). Ideally you want pieces that are mostly flat on both sides, similar thickness, and different shapes and sizes. These urbanite pieces are then placed like a puzzle within the perimeter rocks and on top of gravel drainage. You can do multiple layers of urbanite with gravel or sand in between (to fill cracks) to reach desired bench height. At least one layer of urbanite is required to create vapor barrier between ground and bench. Other methods of creating mass are using earthbags (plastic sandbags filled with moist clay/sand mixture and tamped down till hard) or cob and bottle bricks (bottle bricks stacked like bricks with earthen cement (cob) until desired height is reached. Remember that earthen or cement mortar will add another inch or two to the top of your foundation bench mass.
5) Bottle bricks. If creating a back to your bench, you want to make sure you have enough bottle bricks to fit between the posts of your Earthbench. You also want to ensure they are similar size so that they will fit between the posts. To attach the bottles, use smaller sticks on both sides of post and cinch down sticks using wire or zip-ties to hold bottle bricks. You can also use chicken wire on either side and use wire or zip-ties to attach bottles (I recommend the stick method, different builders have different preferences though).
Earthbench Foundation Process - Downloadable Resources
| earthbench_process_back.pdf | |
| File Size: | 1192 kb |
| File Type: | |
| earthbench_process_no_back.pdf | |
| File Size: | 568 kb |
| File Type: | |

